# Oauth2
# oauth2概述
- OAUTH协议为用户资源的授权提供了一个==安全的、开放而又简易==的标准。与以往的授权方式不同之处是OAUTH的授权不会使第三方触及到用户的帐号信息(如用户名与密码),即第三方无需使用用户的用户名与密码就可以申请获得该用户资源的授权,因此OAUTH是安全的。oAuth是==Open Authorization==的简写。
- ==OAuth(开放授权)==是一个开放标准,允许用户授权第三方应用访问他们存储在另外的服务提供者上的信息,而不 需要将用户名和密码提供给第三方应用或分享他们数据的所有内容。OAuth2.0是OAuth协议的延续版本,但不向后兼容OAuth1.0即完全废止了OAuth1.0。
- OAUTH是一种开放的协议,为桌面、手机或web应用提供了一种简单的,标准的方式去访问需要==用户授权的API服务==
- OAuth的出现就是为了解决访问资源的安全性以及灵活性,使得第三方应用对资源的访问更加安全。
# oauth2的思路
OAuth在"客户端"与"服务提供商"之间,设置了一个授权层(authorization layer)。"客户端"不能直接登录"服务提供商",只能登录授权层,以此将用户与客户端区分开来。"客户端"登录授权层所用的令牌(token),与用户的密码不同。用户可以在登录的时候,指定授权层令牌的权限范围和有效期。
"客户端"登录授权层以后,"服务提供商"根据令牌的权限范围和有效期,向"客户端"开放用户储存的资料。
# oauth2流程
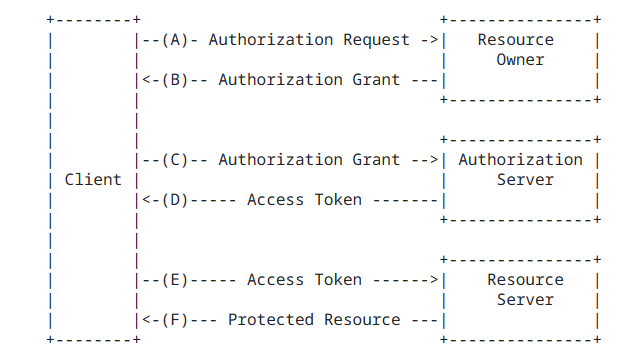
(A)  The client requests authorization from the resource owner.  The
        authorization request can be made directly to the resource owner
        (as shown), or preferably indirectly via the authorization
        server as an intermediary.
        用户打开客户端以后,客户端要求用户给予授权。
   (B)  The client receives an authorization grant, which is a
        credential representing the resource owner's authorization,
        expressed using one of four grant types defined in this
        specification or using an extension grant type.  The
        authorization grant type depends on the method used by the
        client to request authorization and the types supported by the
        authorization server.
        用户同意给予客户端授权
   (C)  The client requests an access token by authenticating with the
        authorization server and presenting the authorization grant.
        客户端使用上一步获得的授权,向认证服务器申请令牌。
   (D)  The authorization server authenticates the client and validates
        the authorization grant, and if valid, issues an access token.
        认证服务器对客户端进行认证以后,确认无误,同意发放令牌。
   (E)  The client requests the protected resource from the resource
        server and authenticates by presenting the access token.
        客户端使用令牌,向资源服务器申请获取资源。
   (F)  The resource server validates the access token, and if valid,
        serves the request.
        资源服务器确认令牌无误,同意向客户端开放资源。
2
3
4
5
6
7
8
9
10
11
12
13
14
15
16
17
18
19
20
21
22
23
24
25
# oauth2四种客户端授权方式
- ==授权码模式(authorization code)==
- 简化模式(implicit)
- 密码模式(resource owner password credentials)
- 客户端模式(client credentials)
授权码模式(authorization code)是功能最完整、流程最严密的授权模式, 大多数第三方应用认证采用这种方法
# oauth2授权码模式详解
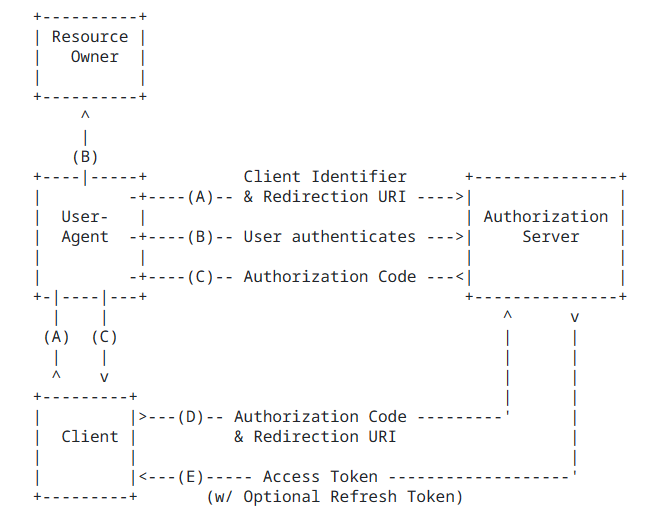
 (A)  The client initiates the flow by directing the resource owner's
        user-agent to the authorization endpoint.  The client includes
        its client identifier, requested scope, local state, and a
        redirection URI to which the authorization server will send the
        user-agent back once access is granted (or denied).
        用户访问客户端,后者将前者导向认证服务器。
   (B)  The authorization server authenticates the resource owner (via
        the user-agent) and establishes whether the resource owner
        grants or denies the client's access request.
        用户选择是否给予客户端授权。
   (C)  Assuming the resource owner grants access, the authorization
        server redirects the user-agent back to the client using the
        redirection URI provided earlier (in the request or during
        client registration).  The redirection URI includes an
        authorization code and any local state provided by the client
        earlier.
       假设用户给予授权,认证服务器将用户导向客户端事先指定的"重定向URI"(redirection URI),同时附上一个授权码。
   (D)  The client requests an access token from the authorization
        server's token endpoint by including the authorization code
        received in the previous step.  When making the request, the
        client authenticates with the authorization server.  The client
        includes the redirection URI used to obtain the authorization
        code for verification.
        客户端收到授权码,附上早先的"重定向URI",向认证服务器申请令牌。这一步是在客户端的后台的服务器上完成的,对用户不可见。
   (E)  The authorization server authenticates the client, validates the
        authorization code, and ensures that the redirection URI
        received matches the URI used to redirect the client in
        step (C).  If valid, the authorization server responds back with
        an access token and, optionally, a refresh token.
        认证服务器核对了授权码和重定向URI,确认无误后,向客户端发送访问令牌(access token)和更新令牌(refresh token)。
2
3
4
5
6
7
8
9
10
11
12
13
14
15
16
17
18
19
20
21
22
23
24
25
26
27
28
29
30
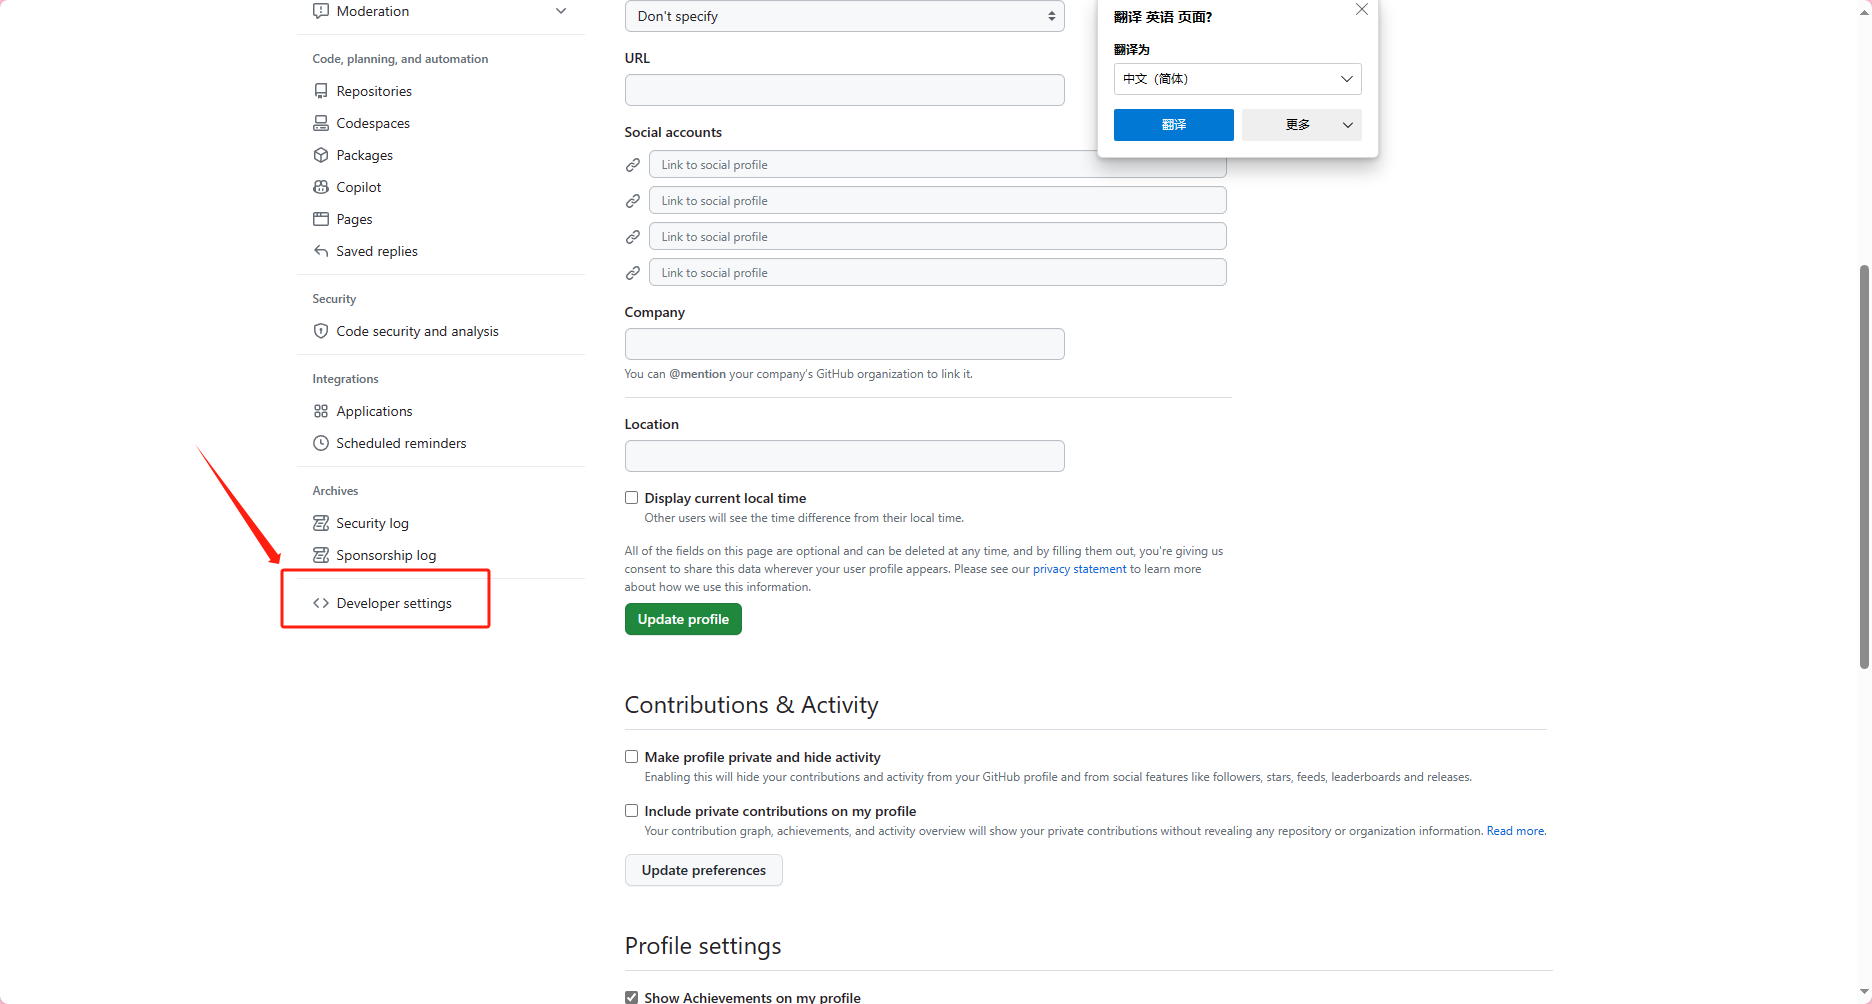
# Github OAuth2认证
# 进入Github个人主页,进入开发人员选项
# 2.创建OAuth app
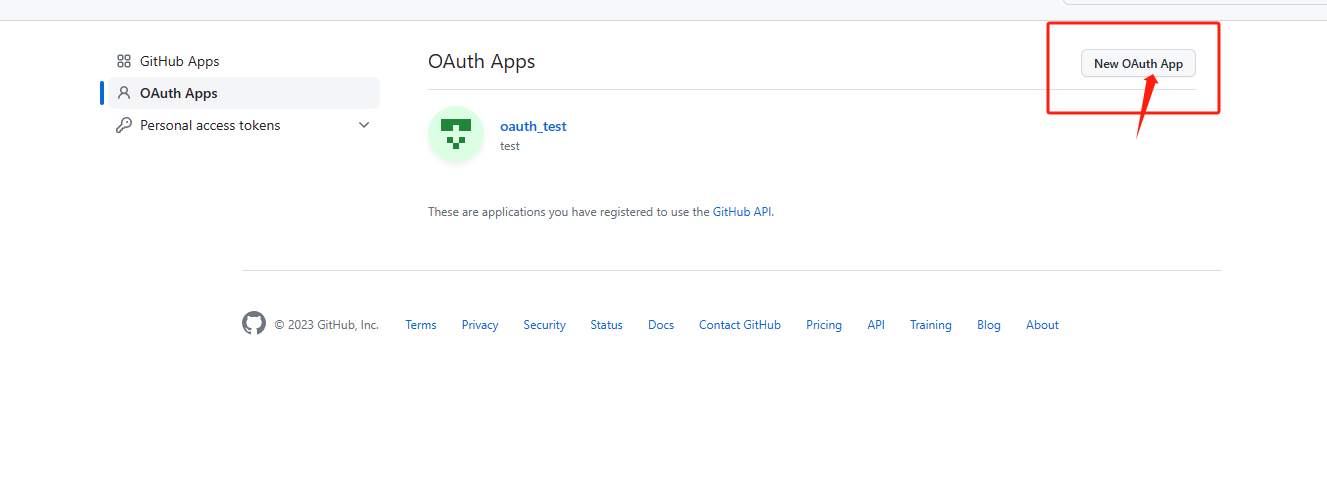
创建完毕即可获得后续认证所需的参数
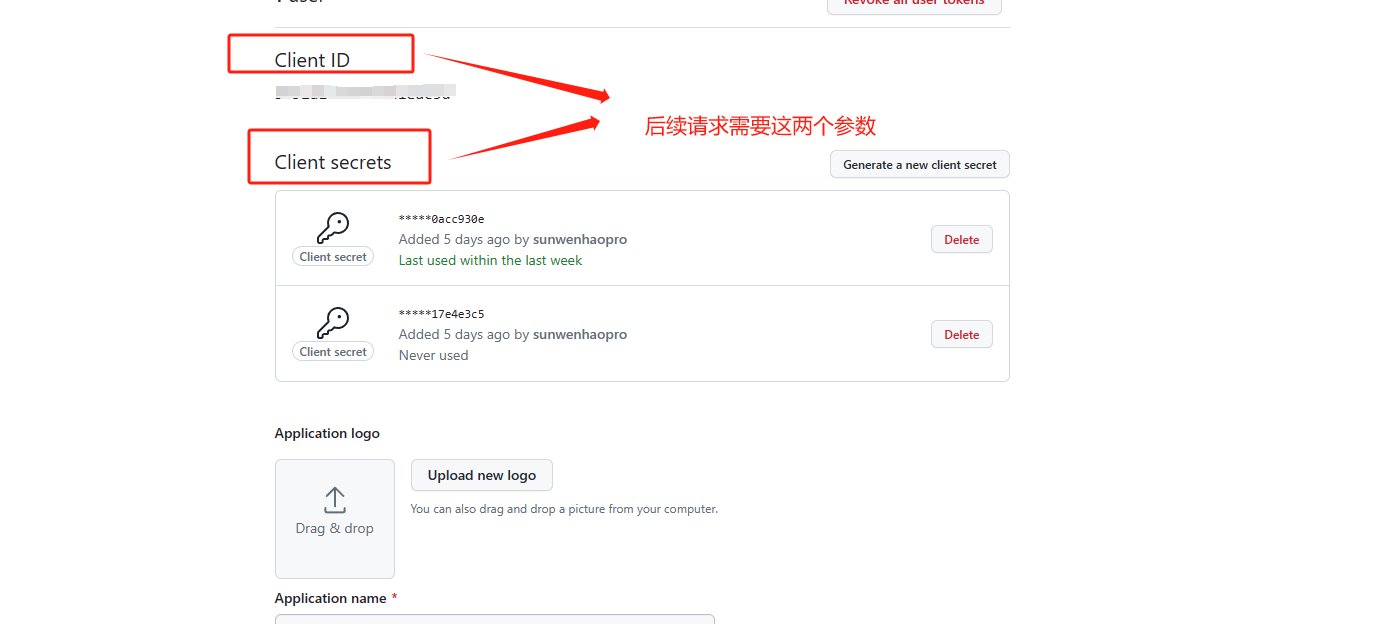
# 3获取应用授权参数
# 

# 4 请求用户的 GitHub 标识
GET https://github.com/login/oauth/authorize
此终结点采用以下输入参数。
| 参数名称 | 类型 | 说明 |
|---|---|---|
==client_id== | string | “必需”。 注册 (opens new window)时从 GitHub 收到的客户端 ID。 |
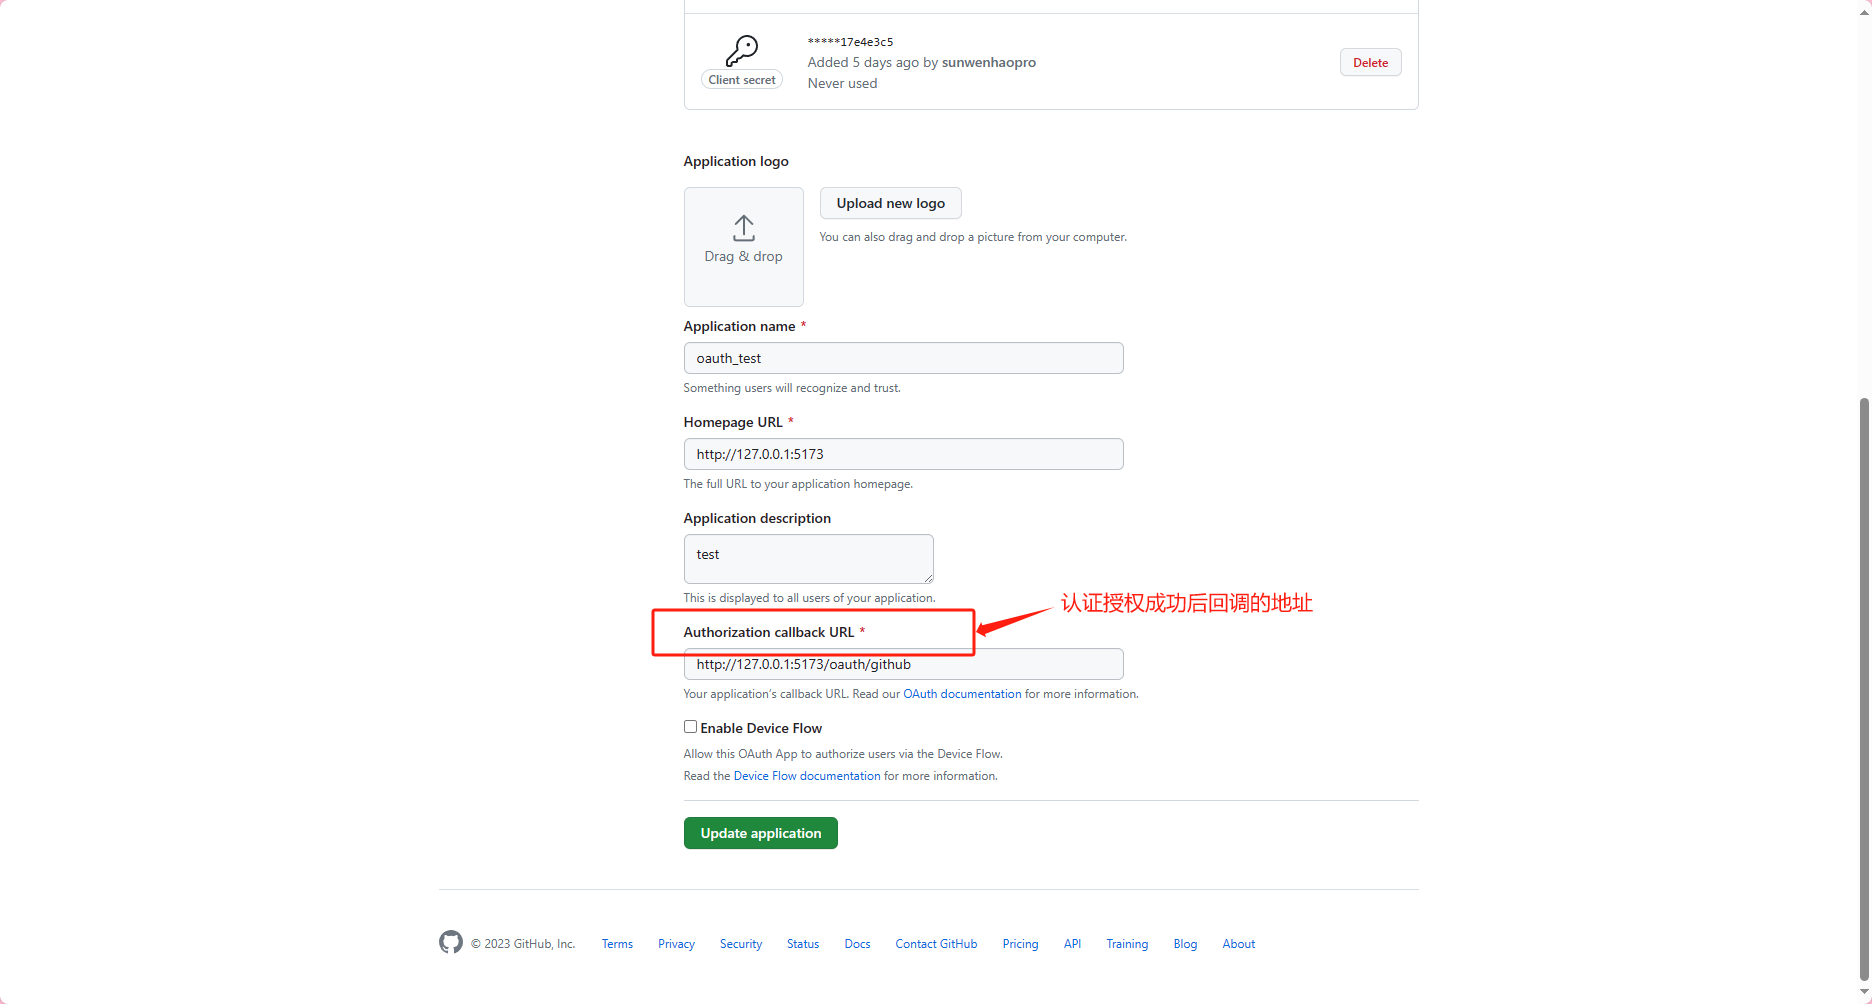
redirect_uri | string | 用户获得授权后被发送到的应用程序中的 URL。 请参阅以下有关重定向 URL (opens new window) 的详细信息。 |
login | string | 提供用于登录和授权应用程序的特定账户。 |
scope | string | 范围 (opens new window)的空格分隔列表。 如果未提供,则 scope 默认为未授权应用程序的任何范围的用户的空列表。 对于已向应用程序授权作用域的用户,不会显示含作用域列表的 OAuth 授权页面。 相反,通过用户向应用程序授权的作用域集,此流程步骤将自动完成。 例如,如果用户已经执行了两次 Web 流,并且已授权一个具有 user 范围的令牌和另一个具有 repo 范围的令牌,则不提供 scope 的第三个 Web 流将收到具有 user 和 repo 范围的令牌。 |
state | string | 不可猜测的随机字符串。 它用于防止跨站请求伪造攻击。 |
allow_signup | string | 在 OAuth 流程中,是否向经过验证的用户提供注册 GitHub 的选项。 默认为 true。 在策略禁止注册时使用 false。 |
# 5. 用户被 GitHub 重定向回你的站点
如果用户接受你的请求,GitHub 会使用代码参数中的临时 code 以及你在上一步的 state 参数中提供的状态重定向回你的站点。 临时代码将在 10 分钟后到期。 如果状态不匹配,然后第三方创建了请求,您应该中止此过程。
将此 code 交换为访问令牌:
POST https://github.com/login/oauth/access_token
此终结点采用以下输入参数。
| ==参数名称== | ==类型== | ==说明== |
|---|---|---|
==client_id== | ==string== | ==必填。 从 GitHub 收到的 OAuth app 的客户端 ID。== |
==client_secret== | string | 必填。 从 GitHub 收到的 OAuth app 的客户端密码。 |
==code== | string | 必填。 收到的作为对步骤 1 的响应的代码。 |
redirect_uri | string | 用户获得授权后被发送到的应用程序中的 URL。 |
默认情况下,响应采用以下形式:
access_token=gho_16C7e42F292c6912E7710c838347Ae178B4a&scope=repo%2Cgist&token_type=bearer
如果在 Accept 标头中提供格式,则还可以接收不同格式的响应。 例如 Accept: application/json 或 Accept: application/xml:
Accept: application/json
{
  "access_token":"gho_16C7e42F292c6912E7710c838347Ae178B4a",
  "scope":"repo,gist",
  "token_type":"bearer"
}
Accept: application/xml
<OAuth>
  <token_type>bearer</token_type>
  <scope>repo,gist</scope>
  <access_token>gho_16C7e42F292c6912E7710c838347Ae178B4a</access_token>
</OAuth>
2
3
4
5
6
7
8
9
10
11
12
# 6. 使用访问令牌访问 API
访问令牌可用于代表用户向 API 提出请求。
Authorization: Bearer OAUTH-TOKEN
GET https://api.github.com/user
2
# OAuth2 Github Demo

# 实现逻辑:
前端添加Github账号授权链接: https://github.com/login/oauth/authorize?client_id=自己申请到的appid
用户点击链接跳转到github官网oauth2认证网页,认证成功后重定向到自己app设置的redirect_uri,即localhost:5173/oauth/github , 并在路由后面添加参数code:
localhost:5173/oauth/github?code=XXXXXXXXXXXX
只需要在当前页面获取到路由里面的code参数,然后将code参数发送到后端接口,通过后端向github发送请求申请access_token,然后再根据token去请求userInfo接口,获取当前授权code的用户信息,根据用户信息去查询本地服务用户是否有绑定用户,如果不存在则让其先注册账号(或者返回一个临时注册凭证,让其填写注册必要信息如密码,账户,然后将注册凭证和表单发送各i后端,自动完成账号新建和账号绑定),如果存在则根据本地用户信息返回token,前端存储token。
# 代码
前端需要两个页面,一个是登录界面,一个是认证重定向页面
登陆界面很简单,仅仅需要自己添加一个自己app的github认证链接
const oauth_github: string = "https://github.com/login/oauth/authorize?client_id=00000000000000000"

回调界面基本不需要展示什么,只需要向后端发送code,也可以添加loading
<template>
</template>
<script setup lang="ts">
import oauthApi from '@/api/oauthApi';
import { setAccessToken, setRefreshToken } from '@/utils/token';
import { ElMessage } from 'element-plus';
import { onMounted,ref } from 'vue';
import { useRouter } from 'vue-router';
const router=useRouter()
const url = ref<string>(window.location.href)
onMounted(()=>{
    sendCode()
})
const sendCode= ()=>{
    let code:string=url.value.split('=')[1]
    oauthApi.sendCode(code).then((res:any)=>{
        console.log(res);
        if(res.code=== 200)
        {
            setAccessToken(res.data.access_token)
            setRefreshToken(res.data.refresh_token)
            ElMessage.success("登录成功")
            setTimeout(()=>{
                router.push('/')
            },500)
        } else {
          ElMessage.error(res.excepction)
          setTimeout(()=>{
            router.push('/register')
          },1000)
        }
    })
}
</script>
<style>
</style>
2
3
4
5
6
7
8
9
10
11
12
13
14
15
16
17
18
19
20
21
22
23
24
25
26
27
28
29
30
31
32
33
34
35
36
后端:
public class AccessGithubToken {
    private static final String CLIENT_ID= "xxxxxx";
    private static final String CLIENT_SECRET= "xxxxxxx";
    private static final String  ACCESS_TOKEN_URL="https://github.com/login/oauth/access_token";
    private static final String  USER_INFO= "https://api.github.com/user";
    private static final  WebClient webClient =WebClient.builder().build();

    public static String  getUserInfo  (String code)
    {
        try {
            String url = ACCESS_TOKEN_URL + '?' + "client_id=" + CLIENT_ID + "&client_secret=" + CLIENT_SECRET + "&code=" + code;
            Mono<Map> accessMono = webClient.post().uri(url).header("Accept", "application/json").retrieve().bodyToMono(Map.class);
            Mono<Map> userInfoMono = webClient.get().uri(USER_INFO).header("Authorization", "Bearer" + " " + accessMono.block().get("access_token").toString()).retrieve().bodyToMono(Map.class);
            System.out.println(userInfoMono.block());


            return userInfoMono.block().get("login").toString();
        }catch (java.lang.Exception e)
        {
            throw new Exception("认证失败或超时!请稍后重试");

        }
    }

}
2
3
4
5
6
7
8
9
10
11
12
13
14
15
16
17
18
19
20
21
22
23
24
25
   public UserVO execute(String code) {
       String loginUserName= AccessGithubToken.getUserInfo(code);
       UserEntity userEntity= userGateWay.findByGithub(loginUserName);
       if(Objects.isNull(userEntity))
       {
           throw new Exception("Github账号暂未于LuckyDraw账号绑定!请先注册账号");
       }
       return UserAssembler.toUserVo(userEntity);
    }
2
3
4
5
6
7
8
9
userInfo:
{login=sunwenhaopro,  avatar_url=https://avatars.githubusercontent.com/u/95746922?v=4, gravatar_id=, url=https://api.github.com/users/sunwenhaopro, html_url=https://github.com/sunwenhaopro, followers_url=https://api.github.com/users/sunwenhaopro/followers, following_url=https://api.github.com/users/sunwenhaopro/following{/other_user}, gists_url=https://api.github.com/users/sunwenhaopro/gists{/gist_id}, starred_url=https://api.github.com/users/sunwenhaopro/starred{/owner}{/repo}, subscriptions_url=https://api.github.com/users/sunwenhaopro/subscriptions, organizations_url=https://api.github.com/users/sunwenhaopro/orgs, repos_url=https://api.github.com/users/sunwenhaopro/repos, events_url=https://api.github.com/users/sunwenhaopro/events{/privacy}, received_events_url=https://api.github.com/users/sunwenhaopro/received_events, type=User, site_admin=false, name=null, company=null, blog=, location=null, email=null, hireable=null, bio=null, twitter_username=null, public_repos=13, public_gists=0, followers=3, following=12, created_at=2021-12-08T09:43:24Z, updated_at=2023-10-06T12:26:09Z}
2
3
# 效果